-
Solution History
Last time we were talking about the Class Progress which can help you see how good your class is going. Now let's see how we can go even deeper.
When you work remotely with your class or you don’t have a chance to watch over your students’ shoulders and see how they are actually solving code puzzles - we have a tool called the Solution History.
The idea of this tool is to show you the student’s process of solving the mission. If your student got stuck on one of the missions, then you might wonder what was the trail of thought that he was pursuing before giving up.
Let's check this out!
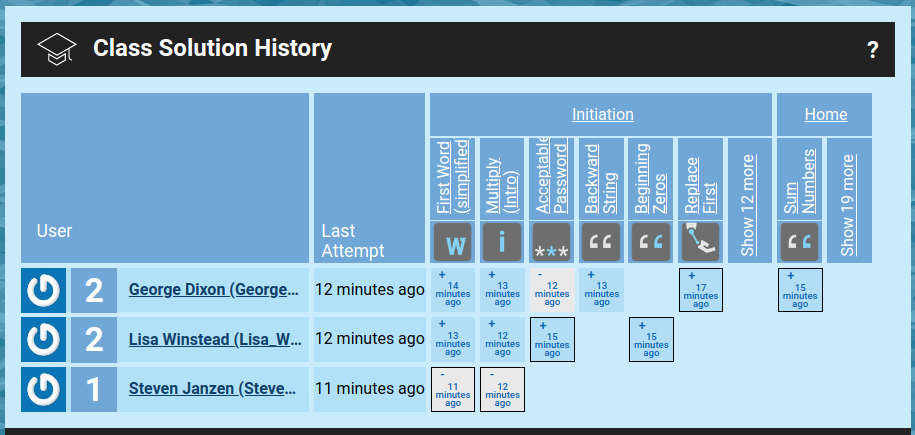
It looks almost the same as the Class Progress page, we’ve covered in the previous article. We have students on the rows and missions on the columns, but the cells are different. By clicking on any of those cells you'll go right to the solution history for a particular mission. Using buttons and scrolls you can see how your student’s has code changed over time. You can make a lot of useful conclusions by simply exploring this history. What they were trying to do but gave up, how they were thinking about the mission, where they got stuck and so on. If your class has just started, it’s very important for every student to be on track…
But eventually this table becomes too big to figure something out, or even to understand where to start. This is why we’ve added several small hints that help you navigate.
The time label inside each cell shows when was the last time the student had changed something here, and the cells with black borders show that this mission was one of the last two missions for the student, so here you can find the most recent code.
Also you might notice that every cell has different intensity of blue color. It indicates how many iterations were made with the solution. Light blue shows that the editor was probably just opened, and a couple of edits were made before it was closed, but dark blue shows that the student spent a lot of time working on this mission and if you see the minus in this cell, then it’s definitely worth spending some time on helping your student out.
This is pretty much all you need to know about the Solution History, except probably the "Last Attempt" column which shows when was the last time students touched any code on CheckiO, you can literally call this "Last visit of HomeWork".
So, if you aren’t a mind reader, which, let’s face it, a hard thing to pull off, this tool will bring you a pretty close to one. Understanding one’s trail of thought - it’s something you can’t always achieve under other circumstances. That’s why it’s harder to help students correct where they went wrong and guide their thought process. But with the Solution History you have an actual road map of one’s mind and you can use it to navigate your class and make learning much more effective.
In the next article we will learn how your students understand the topics you’ve gone over